Showing posts with label Life Skills. Show all posts
Monday, July 26, 2010

Montessori Monday: Water Serving

One of the things I appreciate the most about the Montessori method is the idea of setting up a child's environment so that they can have a certain level of independence.  I think that too often we under estimate the abilities of children.  I also think that allowing children a certain level of independence helps boost their self esteem.


If you visit any Montessori classroom you will probably see some type of pouring activity in their practical life section.  Students typically start our pouring with beans or other dry material and eventually move up to pouring with water.  I decided to put all of this pouring practice to use in our house by setting up a drink station for the kids.

How this station came about:
For awhile, I felt like I was filling up sippy cups all day long.  The kids would usually take a drink, set their cup down somewhere, lose it, and then ask for another sippy cup full of water.  Between the two of them I was filling up cups every 20 minutes all day long---and then going through the house and collecting all of the lost cups so I could wash them.  It was insanity.  I decided that a big part of the problem was our whole sippy cup set up.  Sippy cups don't require care.  You can just throw them down anywhere without having to worry about them spilling.  They almost invite the child to be careless with them.  Another part of the problem was that we simply had too many cups.  Lots of cups = lots of dishes! And finally, a huge part of the problem was that the children currently had no way of getting a drink for themselves. 

So I set off to think of a way to make this possible for them to do.  Some would call this neglectful parenting, I call it Montessori!  ;)

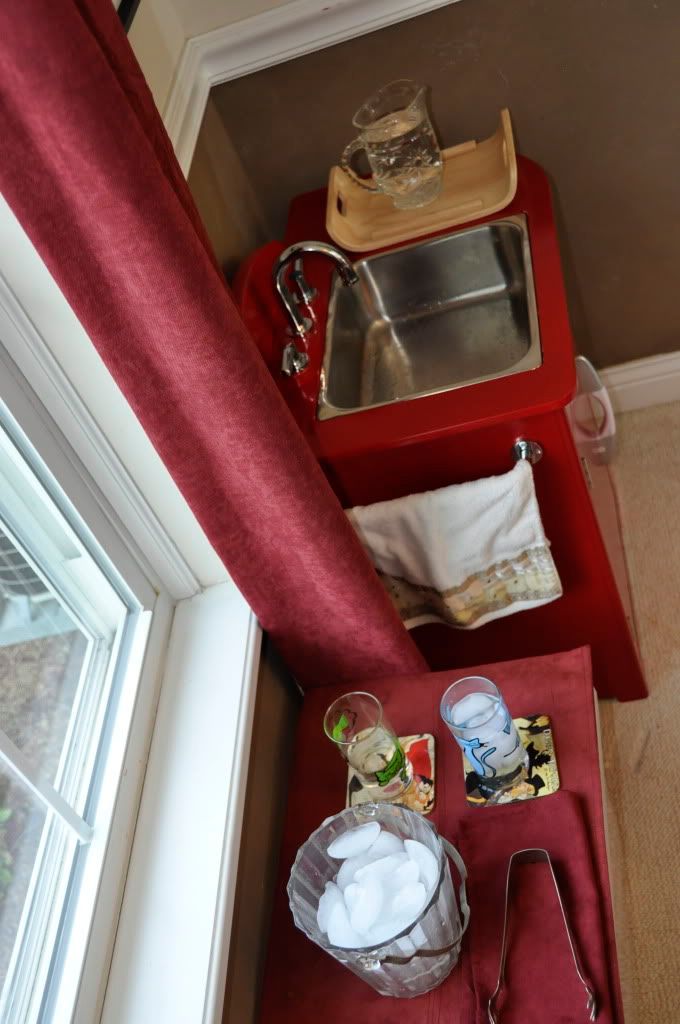
Here is where the kids are able to pour themselves a glass of water whenever they want.  Every morning I set out clean glasses, fresh ice, and fresh water.  The rest is up to them.   So far they have loved it! 

Here is a close up of the little side table I added to our sink.
 
It took some tweaking to find a setup that allowed the kids to do this independently. 
At first I tried storing all of this stuff next to the sink, but it was too hard for Sophia to reach around things without knocking over a cup.  She needed more room, so I used a clear plastic bin as a side cart to give them some counter space.   Even though it is just a plastic bin, I tried my best to dress it up and make everything look "pretty" and nice for the kids.  That way they would know that these glasses are something to be taken care of.  Not something you just throw on the floor.

One the side cart we have a glass for each child.  (Marcus gets the blue glass, Sophia gets the green.)   They also have an ice bucket, ice tongs, a coaster, and a napkin to store the tongs on. 

On the sink I am storing the pitcher of water that way they won't have to carry it anywhere. 
 It took a little tweaking to find a process that they were able to do independently.  What we finally found worked the best was to have the child fill their cup full of ice.  (They LOVE using ice tongs by the way!!)  Then place their glass in the metal sink and pour water using both hands on the pitcher.  (The metal sink is able to catch any spills.)  Then when they are finished, they know how to wipe up any spills and rehang the towel. 
To see what other Montessori inspired activities we have gotten into this past week, check our our weekly wrap up post here.
Saturday, June 26, 2010

Learning and Playing: Our Week in Review

 Math:
We practiced number identification and counting using a mama-made snake counting game.


Language Arts:
We practiced letter identification and phonics by making an "S is for Snake" craft to add to our alphabet books.

  
Gross Motor / Dramatic Play:
We went to the pool with our neighborhood friends.  All of the kids pretended to be pirates and sharks swimming in the ocean.  We packed a picnic lunch and had a fun time swimming and playing.
(Photo courtesy of our local pool.) 


Fine Motor Skills
We practiced cutting with safety scissors, painting, and drawing.
Fiskars 93907097 Pre-School Spring Action Scissors

The kids played with their fruits and vegetable cutting set from Plan Toys.  This is a very popular toy in our house.  The kids love to play restaurant and cut their food using the little wooden knives that comes with the tray. 
Fruits and Vegetables Cutting Set

We played with our magnetic fishing game puzzle.  This is another big hit over here.  I highly recomend these puzzles.  They are a great idea on making the standard wooden puzzle more interesting.  the kids use a magnetic fishing pole to catch the sea creature shaped puzzle pieces.  Then, in order to play again, they have to put all of the puzzle pieces back into place.  This toy taught the kids the names of some new sea creatures and it is a great fine motor activity. 
Practical Life:
We worked on learning how to wash and dry our hand properly and Sophia worked on learning to use the potty.  Marcus has also decided that he is ready to move on to using the big potty. 

Science / Nature Study 
We observed a robin sitting on her nest.  We also found several abandoned nests in some crab apple trees at my mama's house.

The kids also picked strawberries and blackberries. I couldn't believe how many strawberries little Sophia fit into her tiny belly!

 The kids helped me take care of our garden. We harvested our first bell pepper of the season and Doug made a delicious pasta recipe with it using fresh herbs from our kitchen garden. 

The kids dug for worms and went fishing too.


We also spent a lot of time reading some non-fiction children's books about snakes.
National Geographic Readers: Snakes!Find the Snake (Welcome Books)King Cobra (Welcome Books)Watching Cobras in Asia (Heinemann First Library)

We learned a lot about snakes this week from these books.  Here are some facts that Marcus and Sophia picked up:
  • Snakes are cold blooded reptiles.  They do not make milk for their babies and they do not have hair.
  • Some snakes give birth to live young, while other snakes hatch from eggs.
  • Snakes do not care for their young.
  • What venom is
  • A snake molts when it outgrows its skin.
  • Snakes are predators.  Most snakes eat mice, frogs, and lizards.  Large snakes sometimes hunt for large animals like crocodiles and antelope!
  • Some snakes use their noses to smell.  All snakes use their tongues to smell.  
  • You can't see a snakes ears.  However, snakes do have ears.  A snake's ears are deep inside its head.  Sound travels through a snake's bones to it's ears.  
  • Some snakes have heat pits below their nostrils that they use to assist in hunting for prey.  The heat pits can sense the body heat of other animals.  Heat pits help snakes hunt at night.
  • Most snakes live in warm places and stay active all year long.  Some snakes live in cool places and hibernate in the winter.  

 Literature:
We cuddled on the couch and read lots of great books this week.

For more ideas on fun things to do with your kids, check out:
Tot School
and


Wednesday, December 16, 2009

Stree-e-e-etchy Dough Recipe

Here is a fun recipe for a soft and stre-e-e-etchy play-dough.


This play-dough requires no cooking and has a really unique consistency that is fun for squeezing, stretching, pulling apart, and poking. This dough isn't meant for intricate modeling as it doesn't hold its shape well. I found the basic recipe in the book First Art : Art Experiences for Toddlers and Twosby MaryAnn Kohl. (A fantastic book that I highly recommend!)


Materials:
flour
vegetable oil
water
food coloring (optional)
measuring cup (1 cup size)
mixing bowels

Suggested Exploration Tools:
straws
plastic knives for cutting
plastic "dough" scissors
small sticks for poking (chopsticks, popscicle sticks, stir sticks or thin dowels)
child size rolling pins

Preparation (Adult):
Before you bring your toddler to the table, do the following:

1) Protect table and clothing- This dough is oily. Which is great for dry skin on hands, but not so great for fabrics so you may want to lay out a plastic tablecloth. If you are also concerned about your clothes, you may want to put on an art smock or apron. I just put the kids in their diapers at the table which makes clean-up even easier!

2) Set the Table: After protecting the work surface, bring all of your supplies over. You will need a bag of four and a measuring cup. Also, for each child's "spot" set out:
-1 cup oil*
-1 cup water*
- food coloring (optional)
- mixing bowel
- various exploration tools

*TIP: Pre-measure the oil and water. It is one less thing you will have to do once you bring the child over to the table and one less distraction!


Process (Adult and Kids):
1) Have the child pour the water and the oil into the mixing bowel and attempt to stir them together with a spoon.

Observations- Notice that the water and oil do not mix no matter how much we stir. Explain to your child that water and oil are immiscible which means that they can not be blended together. TIP: Don't be afraid to use words like that with your toddlers and preschoolers. Even the littlest scientist will appreciate a large vocabulary.

2) Optional: have the child squeeze in a few drops of food coloring into the water. (Warning: food coloring main stain skin, hands, and clothing.)

Explorations: Name the colors as you show them to your child. "This one is blue. This bottle is red." Give them the power to choose what colors they want to add to their dough. Also, talk about how mixing colors makes new colors. Example: red and yellow make orange; blue and red make purple; and blue and yellow make green. And relax...you will probably end up with dark gray water as your toddler experiments with the colors...or splotchy colors as they struggle to stir like we did. But don't worry or stress. It is more important that they have fun.

Observations: Observe that the food coloring is miscible with the water and changes the water colors. However, the food coloring is immiscible with the oil.

3) Using the measuring cup measure 4 cups of flour into each bowel.

Explorations: Have the child help count out the four cups. Also, allow them to practice pouring the flour into the bowel. Don't worry if it spills. The measurements don't have to be precise.

4) Use a spoon or your hands to stir the flour mixture together. After getting it mostly blended, bring the dough out onto the table and knead it with your hands.

Observations and Explorations: Feel the flour before mixing it. Then feel how the flour changes as we mix it with our liquids. Young children also will probably enjoy kneading the dough with their hands.

5) Allow the children to explore the dough with their various tools for as long as they are interested.

Observations and Explorations: Notice that this dough is incredibly "stretchy". Roll the dough into a "snake" shape. And then show the children how it can be held up into the air and swung around to streeee-e-e-tch it. Model other exploration methods like poking the dough with straws or sticks for example.

Skills Practiced:

-Counting
-Pouring
-Measuring
-Colors
-Fine motor skills
-And many, many, more!
Saturday, August 8, 2009

Fun with Sponges!

Here is how we experimented with sponges the other day:


Materials:
-Different color sponges cut into various shapes
-Two Bowels
-Water and Soap

Preparation:
First I brought out two bowels. One was filled with soapy water and the other was empty. Then I showed the kids several fun shaped sponges.

Process:
Sophia and Marcus examined each Sponge and we talked about what shapes and colors each sponge was. (Marcus still does not having his shapes down...but we are working on it!)

Then we did some comparisons. First we felt a dry sponge. I noted that the sponge was hard and small. Then, we dipped the sponge in the water. We noticed that the sponge got bigger and became softer. We talked about how the sponge was full of water.

Next, we learned how to "squeeze a sponge out". I picked up one of the wet sponges and SQUEEZED out the water from it. Then they gave it a try. They laughed and giggled to see all of the bubbles it made when you squeezed a sponge out.

Finally, we used the sponge to transfer water to the empty bowel. We would dip it into the full bowel to get it wet, then take it over the empty bowel and squeeze it out. This is an excellent activity for kids to do because it uses many of the hand's muscles to do a squeezing movement.

Extra Credit:
Life Skills- Marcus used the sponge to practice wiping off our garage floor. Man, it needed a good cleaning! Thanks Marcus!

Who knew you could learn so much from a sponge!?


And in case you are wondering...
As soon as Sophia learned we were going to be doing something with water, she insisted that she wear her sesame street raincoat. It was very funny.
 

Blog Template by BloggerCandy.com