Showing posts with label Homemaking. Show all posts
Sunday, June 10, 2012

Homemade Laundry Detergent for High Efficency (HE) Machines


I have grated the tiny bars of soap.  I have mixed giant vats of liquid goop detergent.  I have even used my pans on the stove to cook (yes cook) soap on my stove.   In short readers, I have put in the time and trial and error to test some of the most popular homemade laundry detergent/soap recipes around.  And I present to you what I consider to be the BEST...yes THE BEST homemade laundry soap recipe ever.  I would love if you would try it out and let me know what you think.  

But before I go into all of the details, you may be wondering WHY someone would go to all of the hassle of making their own laundry detergent.

There are many, many reasons...but here are just a few:
1)  Making your own detergent is a very easy way to go green.
Most commercial laundry detergents contain phosphates and other ingredients which are harmful to both you and the environment.   According to the Association of Home Appliance Manufacturers, the average family does 416-520 loads of laundry per year!  Think for just a second how much water and energy is used up in this country just through trying to clean our clothes.  Seconldy, think about where all of that water is going after it cleans your clothes.  Simply switching to a more natural detergent could have a huge impact on the environment....and trust me it is an easy change.  (Even I can do it and I am lazy!)
Also, think about how many empty containers you are throwing away each time you run out of laundry detergent.  Even if you recycle those containers, think about the energy that is used in that process. 

2)  Making your own laundry detergent and other cleaning supplies can save you a boat load of money.
We have a high efficiency washer and so every month or so we were spending a TON of money buying Tides HE detergent.   (It really is expensive!) This recipe uses a lot of low foaming ingredients so it is perfect for HE machines.  Also, you are not having to pay for all of the packaging and marketing that goes into a conventional detergent.  And I promise you, the cleaning power of this detergent is fantastic.  I have very young children.  We get really dirty.  (Seriously...look at my blog pictures)  And this detergent has been able to clean just as well if not better than our standard Tide HE detergent.

And even if you don't have a HE washer machine, you have to admit that laundry detergent is not cheap.  At least not compared to how cheap this recipe is.  Using this recipe, you can make an entire years worth of laundry detergent for less than $5.  (Prices vary depending on costs in your area...but I know it will be much cheaper than the pre-packaged stuff you are buying now.)

3)   When you make your own supplies, you don't have to keep running to the store to pick up more detergent (or windex or "scrubbing bubbles" or any of that stuff!)  ---And that is kind of freeing and cool. 
See the thing that hangs most people up about making your own cleaning products is the discipline it takes.  No matter how easy the recipe is,  making something from scratch does take more time than simply opening up a container of commercial product.  So the thing that would always throw me off track would be I would a) run out of detergent and then b) be having "one of those days" where the last thing I wanted to do was MAKE laundry detergent.  So I would always end up running to the store to pick up a commercial product.  However, with this recipe, you only have to spend a couple of minutes one afternoon making it, and then you have a WHOLE years worth of detergent.  (If you have an HE machine, you will actually have much, much more than a whole years worth!)  This is also a powdered detergent.  So, unlike the other homemade liquid forms of laundry detergent (which can sometimes get moldy)--this one will last indefinitely.  

4)   Using recipes like this is an easy way to give your cleaning supplies a makeover--Simplify! Simplify!  Simplify!
Do you open up your cleaning supply cabinet to see a ton of different bottles and boxes?  Do you have a bottle for glass cleaner?  Another bottle of stuff for cleaning the toilet?  Another for the counter tops?  Another for the stove?   In fact, do you have an entire cabinet full of boxes and bottles claiming to be the 'next best thing' when it comes to cleaning.   Chances are that your grandmother (or maybe great grandmother depending on your generation) didn't need to have 50 million bottles and boxes of stuff to get her house clean.  She probably relied on a few basic essentials such as vinegar and baking soda to get her whole house clean.  So if women have been keeping their house clean and tidy for years with those things....why of why do we spend hundreds of dollars buying all of those boxes and bottles of cleaning supplies?  The answer is marketing.  We all fall victim to it.  (At least I do!)  But the truth of the matter is that these simple ingredients used in previous generations still work just as well for cleaning and cost a fraction of the price.  Most of them are also better for the environment.

5)  Making your own cleaning supplies allows you to customize your scents and blends.
One of the unexpected benefits to making my own cleaning supplies is that I have enjoyed experimenting with essential oils.  I can choose exactly what "smells" I want my own special blend of cleaning supplies to have.  And to be honest, it makes cleaning a whole lot more enjoyable!  Instead of breathing in those toxic fumes like I was before, I am now smelling a faint and lovely "lemon verbena" smell as I wipe down my counter tops.  Or--perhaps I might have "lavender vanilla" sheets to sleep on at night.  I can even change my scents with the seasons.  Last autumn, I made a lovely general purpose cleaner and scented it with Sweet Orange, Cinnamon, Clover, and Ginger essential oils.  It made deep cleaning in the fall an almost enjoyable experience.  Almost. :)   At least it was better than the noxious, over powering smell most commercial cleaners have!

So those are just a FEW of the reasons you may want to consider making your own laundry soap and cleansers.

Making your own Laundry Detergent:
Now, when you start experimenting with making your own laundry soap, you will basically have two different choices:  liquid or powder form soap.   I typically bought commercial liquid detergent when I went to the store...so the first recipe I tried was for a homemade liquid detergent.  The liquid detergent cleaned just fine...but it sort of had a strange consistency which kind of freaked me out.  (Its difficult to describe in words, but if you have ever made it yourself, you will know what I am talking about.)   I have also read reviews online of mold even growing on liquid detergent if it was stored for long periods of time.  That wasn't going to work for me.  I wanted a recipe that was easy to make and store...one that would last indefinitely so I didn't have to keep making it over and over again.  So I ruled the liquid version out.

The next several versions I tried were for powdered laundry soap.  All of the powdered laundry soap recipes out there basically involve some ratio of the following ingredients:
1)  Borax
2)  Soap Flakes or Grated Soap
3)  Baking Soda
4)  Washing Soada
5)  Oxi Clean

I test several of these recipes out.  But the BEST recipe by far was in the book Clean Naturally by Sandy Maine.   Ms. Mains book is a great read.  She is an authority in soap making, so it didn't surprise me that her cleaning supplies worked so well.  However, the thing I enjoyed most about her book is her overall philosophy about cleaning and life in general.

This recipe seems to work fantastically in both hard and soft water.  This recipe also doesn't have any of the more expensive or hard to find ingredients (such as washing soda and oxi clean).  It smells great.  It is low foaming.  It is gentle enough for our clothes, yet tough on stains.   So the recipe that I use today is a sort of modified version of Ms. Sandy Maine's.
----------------------------
So---Now...without further ado.....here is my FAVORITE laundry soap recipe.  (Perfect for regular or High Efficiency Machines).

Simple Washing Powder Recipe
16 cups of baking soda
12 cups of borax*
8 cupts of grated soap**
3 tbsp of your favorite essential oils (optional)


* BORAX Note:  You will typically find borax in the laundry detergent aisle of most any grocery store of home goods store.  (I know that Meijer's, Walmart, Kroger's, and Giant Eagle all carry it.  If you are from another part of the country, please feel free to use the store locator on their website to find it.)

**SOAP Note:
--IF you are making your own laundry soap for environmental reasons, it is best to use a grated castile or glycerine soap.  You can buy these soaps at locally at a health food store or online.
--IF you are making your own laundry soap as a means of saving money, I have found that a regular bar of grated soap works just as fine.  HOWEVER (and this is important) you want to buy the most plain and simple bar of soap that you can find.  Anything that looks like it would be good for your skin will be bad or your laundry.  You want to avoid anything with added moisturizers or aloe as they often leave a film on your clothes or laundry machine.  I have found that the brands Ivory and Feliz Napa works best.

Directions:
1)  Grind or grate your soap.  Yes...you can grate the soap using a cheese grater.  But I have found that  Ivory soap grates VERY will in a food processor.  Cut the soap up into small 1" cubes.  (Ivory soap is very soft and easy to cut.)  Then place it in your food processor one bar at a time and grind it up.  Wash your food processor well after doing this.  ;)
2)  Mix the grated soap, baking soda, and borax into a large air tight container.  (A wire whisk makes mixing very easy.)
3)  Add the Essential Oils if desired.  (If you are making this for purely budget reasons, you may want to skip the essential oils.  It smells great without them.  They are just a fun bonus.)
4)  To make more of less of this soap, just mix ingredients sticking to the same general ratio of 4 parts baking soda, 3 parts borax, 2 parts grated soap.   This recipe yields enough to do aprox 144 loads in an HE machine and 35 loads in a regular machine.  I suggest that you make a small batch at first to try it.  THEN, later, when you see how much you love it, make enough to last a year.  

To use:
Use 1/2 cup for Regular Machines for regular soiled loads.  For heavy soiled loads, you can up this to 1 cup. 
Use 1 Tbsp for HE Machines for regular soiled loads.  For heavy soiled loads, you can up this to 1/4 cup.

For a printable version of these ingredients and directions, click here.


Tuesday, February 22, 2011

Behind the Scenes: Our Learning Environment

I think that a good environment for a preschooler should be one that naturally encourages exploration and playful learning.   So I have tried to set up our house to do exactly that.  A Montessorian would call this a prepared environment, and unschooler would call this strewing...I just call it our home.  And here is a behind the scenes look at how we have it set up. 

If you notice we tend to have an area for the kids in almost every room of the house.    I do this for several reasons:
-The first and most important is that it keeps kids busy, and a busy kid is a good thing in my book.  A bored kid often tends to get into things that they shouldn't.  A bored kid often tends to fight with their sister or brother.  And a bored kid is also usually "high maintenance" and makes it so it is hard to get anything done around the house.
-The second reason is that I don't spend all day in one room.  My kids naturally tend to follow me around wherever I go, and this gives them something to do as they move from room to room.
-The third reason I do this is because I feel strongly that this is our kid's house too!  Just like my husband and I have something of "ours" in every room, so do our kids.  It doesn't seem natural to us to confine them to one room or area. 


Our listening Center:
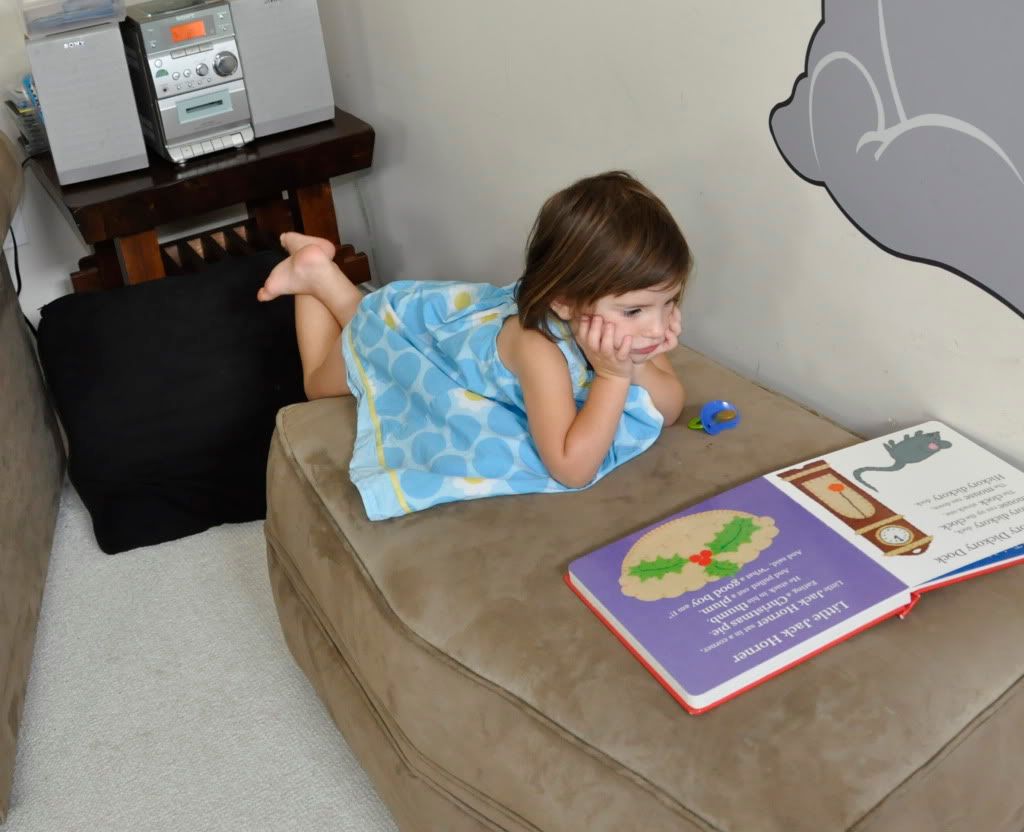
Our listening center is in our family room next to the couch where we usually read together.  The kids have several audio books and musical CDs that they can listen to here.  The listening center has a comfy ottoman for laying on while reading, a CD player that is easy for a toddler to work, and plenty of floor space for dancing!
Sophia listening to a Nursery Rhyme CD while following along.
Our Favorite Listening Center Products:
-Themes To Remember, Volume 1,
- Wee Sing Nursery Rhymes and Lullabies,
- Poetry Speaks to Children (Book & CD) (Read & Hear) 
- Various Audio Books for Children (Purchased or record your own)


Our Library:
Near our listening center, we have our home library.  This is several bookshelves that hold all of our families books.  We try to keep these organized by subject.  My husband and my books are on the higher shelves, the kids books are on the lower shelf. 


Water Serving Station:
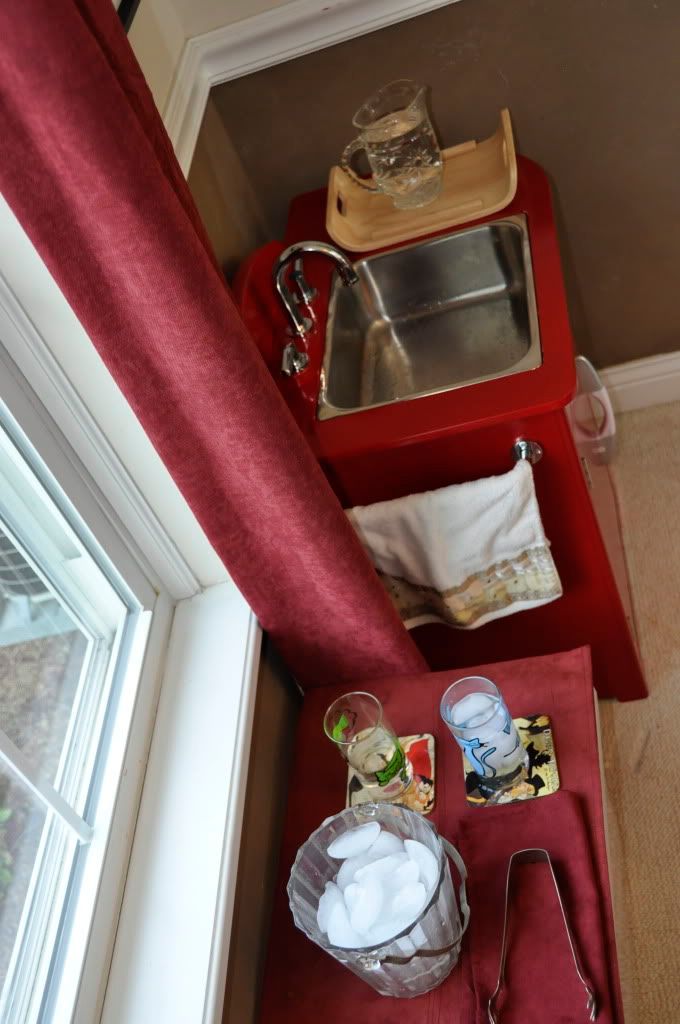
I try to encourage the kids to help themselves to their own snacks and drinks.  We have a little water serving station sent up for them.  You can see the blog post about it here. 

Help yourself to a glass of water
Update:  Since that post was published, the water station has now now been moved to the kitchen on the linoleum floors due to too many spills on the carpet!  :)   We also keep everything on a small table.  Other than that, the setup and equipment remains much the same. 


Our "Classroom":
This is what I affectionately call our classroom.  Although it is really our dining room.  This picture was taken in early February, so as you can see we have it all decked out for Valentine's day.  This has a small child sized table that we use for painting and other activities that are best done sitting.  
Our "Classroom"
Here we have two little "learning shelves" set up.  You can see them next to either side of our hutch.  One we call our "Language Arts shelf" and the other we call our "Montessori Shelf". 


We use the tops of these shelves to house all of our theme books for the month. This particular month, we were reading and talking about John James Audubon and Groundhogs.  (The groundhogs are because of groundhog's day.) Interesting combination...wouldn't you say? 
Our "Language Arts" Shelf - It has a lot of our Handwriting Without Tears (HWOT) Curriculum
On the "Language Arts" Shelves:
On top of the bookcase:

Our "theme" books for the month.   (This month we are studying Groundhogs, Weather, Shadows, and Hibernation in honor of Groundhog's day.)

Top Shelf (left to right):
Blue Basket - Mat Man Building Supplies
Wooden Box - Wooden Pieces for Capital Letters
Workbooks (Let's Cut Paper! (Kumon First Steps Workbooks), Let's Sticker & Paste! (Kumon First Steps Workbooks), and HWOT Get set for School Workbook)

Middle Shelf (left to right):
Wooden Box for HWOT Wet, Dry, Try Technique Tools (Slate , Little Chalk Bits, Tiny Sponge Cubes)
Sandpaper Letters from Polliwog Learning on Etsy.com
Tub of Tiny Crayon Pieces (The tiny pieces help force the child to grip them correctly)
HWOT Stamp-n-See Screens

Bottom Shelf (left to right):
Green Basket - HWOT Roll-a-Dough Screens, Homemade Playdough (recipe here)
Larger Green Basket - HWOT Capital Letter Cards and Blue Mats

Montessori Shelf

On the Montessori Shelves:
 On top of the bookcase:

Our Art books for the month.   (This month we are studying John James Audubon.)

Top Shelf (left to right):
- Yellow Basket -Melissa & Doug See & Spell
- Sandpaper Numbers from Polliwog Learning Products
- Clear Zipper Pouch - Melissa & Doug Beginner Pattern Blocks

Middle Shelf (left to right):
- Wooden Box-Melissa & Doug Bead Sequencing Set
- Second Wooden Box - Various Magnet exploration items (Magnetic Balls, Magnetic Wands, Stack and Match Magnet Rings)
- Red, Yellow, Blue and Green Wooden Boxes -Montessori Knobless Cylinders

Bottom Shelf (left to right):
- Various Beading Activities (Melissa & Doug Deluxe Wooden 27-Piece Lacing Beads in a Box)
- Plan Toys Cone Sorting
-
- Twist & Turn Sorter


This side of the room has our calendar and "weather" tracking stuff.  We also have an easel out for the kids to write on when ever they want. 
Our Calendar Center

Kitchen:
In the kitchen, the kids have their own little broom center where they can easily reach their tools when it comes to clean up time.  We use got this broom set here for the kids and have been very happy with it.  The vacuum cleaners are called Super Vac Toy Vacuums.  They really suck up small bits of dirt!  (Very small, but every little bit helps!)  We bought ours through Amazon, however I see that they are currently unavailable.  When it comes to clean up time, the kids also have some spray bottles (with vinegar and water) and some rags/sponges.  They help me wipe down the table and winters in addition to helping me clean the floor.
Kid's Cleaning Supplies
 We also have an area for the kids to hang their aprons up next to mama's aprons. 
Hang up your apron please!


Our Nature Study Basket (Has the kids Nature Notebooks, my Nature Journal, some field guides, and Handbook of Nature Study)

Our Basement / Playroom:
The basement is where we keep most of our toys.  Although we try to have a "play area" on every floor of our house.  (It keeps the kids busy and out of trouble!)  Here are some photos of our main play area. 
Play Kitchen Center

Another Picture of Kitchen and Grocery Store Center  (We have a kitchen, a baby bed/high chair, grocery carts, and a cash register to encourage dramatic play)

Shelf Near Kitchen (This holds the Puzzles, Melissa and Doug Latches Board, Larger Wooden Food Pieces, matryoshka dolls, etc.)

Train Table:  We switch this out from time to time and rotate new activities

Playroom Wall

Bookcases full of toys  We have our block center here near the bottom right.

Close up of the "Building Center"  (Design and Drill, Pound and Roll Tower, Melissa & Doug Deluxe Wooden Pound-A-Peg, Various Pretend tools)

Chalk Board Magnetic Wall, Building Center and Small Table

Dress Up Clothes and Props- I Still need a mirror for this area so the kids can check themselves out
Links to Become Attached To:
-Don't waste your Homemaking
-Homemaking Link-Up
-Tot Tuesday
- Tot School
-We Play
- Montessori Monday
- Preschool Corner


Thursday, February 10, 2011

My Top Ten Tips for Tackling Chores

Yesterday I talked a bit about putting together a "To Do" list to organize what needs to be done.  Today I would like to talk about my top 10 tips for tackling those "To Do" lists.
Number 7:  Don't hold yourself up to unrealistic expectations!

1)  Purge, Purge, Purge:  One of the biggest reasons that it can seem so hard to manage a household is that we just have too much stuff!  So I really encourage people to simplify their lives by purging the stuff that you don't need.  Do you really need more than 2 bedsheets per bed?  Do you really need 20 plates for a family of 4?  Do you really need so many towels?  Consider paring down and only keeping the things you absolutely need and use on a daily basis.  Also, if it is broken, just get it out of your house.  Don't keep it around by telling yourself you are going to fix it one of these days.  Because you won't!  If you haven't used something for the past six months, it is likely something that you don't need to have around.  So purge the stuff.  Donate the stuff to someone who really does NEED it.

2)  Deep Clean Periodically and then spend the rest of the time just maintaining:  If possible, have someone take the kids out of the house some weekend and spend the entire time deep cleaning your house.  Get it to a nice super clean state.  Then just focus your time during the week to maintaining it.  Once you notice your house getting totally out of control again, then schedule another "deep cleaning" appointment with yourself.  


3) Have a Place for Everything and Everything in its place- Make a rule that if something comes into your house, it needs to have a set place.   If you don't have a place for it, then you need to make a place.  If you aren't able to make or find a place than you shouldn't have it in your house.  Also, you shouldn't be the only one who knows about "the place" and is able to put it in.  If your organization system is so complicated that only you can figure it out, than only you will ever be able to put it away.  If no one but you knows where the proper place for something is, than guess what?  You will be the only one who knows where to put it.  I know that sounds simplistic, but this really is a common problem with a lot of homemakers. 


4)  Never let things get too bad-  Sure your house is not always going to stay crystal clean.  If you are going to have a fun, active, comfortable house that people actually live in, there are going to be messes.  That is part of life.  However, try your best not to let the messes get too out of control.  Try to keep on top of certain tasks that tend to pile up EVERY DAY.  (Like dishes and laundry for example.)   Do a little bit every day so that the tasks doesn't become this huge, overwhelming thing.

5)  Enlist the help of your family-  Accept that you are never going to be able to get it all done yourself.  You are not the only one creating the mess, so you shouldn't be the only one cleaning the mess.  It is OK to ask and expect help around the house.  Even very little kids can help with getting the house picked up and it teaches them some valuable skills that they can use as an adult.

6)  Schedule a "Quick Clean" at least once a day:  At least once a day (maybe several times a day if you need it) get everyone together to participate in a "Quick Clean".  This is just a quick clean where everyone does what they can to quickly straighten the house.  I have found it helpful to give everyone a specific job to do during the "Quick Clean".  For example, one child might help pick up toys, another one might put books back on the shelf, mom might really quickly load up the dishwasher, etc.  We will sometimes play a really FAST song on it and everyone will run around as quickly as they can cleaning.  This makes it a bit more fun for everyone involved. This is also related to item number 4 on the list, as it keeps the house from ever getting REALLY bad.  (And if it does get REALLY bad again, it is time to schedule another deep clean.  See number 2!)

7)  Don't hold yourself up to these unrealistic standards.   Too many woman hold themselves up to these completely unrealistic expectations and then feel like a failure when they fail to meet those expectations.  Don't do this to yourself.  Have realistic expectations for what is going to be acceptably "clean and orderly" in your house.  

8)  Use Lists to stay organized- Don't try just to remember everything that needs to be done.  Make lists, make a lot of them, and make them for everything.  Just writing something down instead of trying to remember it will help free up your mind to concentrate on other things.  It can be downright exhausting trying to mentally remember all of the things that need to be done.  You may not even know that you are mentally exhausted until you finally get everything down.  Sure making a list takes time, but I promise you it is going to help you get more done in a shorter amount of time, stay better organized, and you aren't as likely to forget all of those things you need to do. 

(Need a list?  Check out The Attached Mama's Printable Chore lists here.)  

9)  Learn to associate certain daily chores with activities that you do every day-  I have found that if I associate a chore with something I naturally do most days I am more likely to get it done.  So make it a point to wipe down the bathroom counters every time you put your toddler in the bath.  Make it a point to unload the dishwasher before you make breakfast.  That type of thing.


10)  Meal Plan:  Chance are that at the end of the day you are going to be feeling exhausted and the last thing you want to think about is throwing a meal together.  Learn the art of meal planning.  It will save you a lot of money at the grocery store;  It will possibly SAVE your family dinner time; It will probably be a lot healthier for your family; but most importantly, it will make your life easier.  So set a time aside each week (or month) where you plan out your meals. 


This is Part 2 in my series on Household Chores:
1)  Part 1:  Printable Chore Lists
2)  Part 2:  Top Ten Tips for Tackling Chores  (You are here)
Wednesday, February 9, 2011

Printable: A Busy Mom's To Do List

 Updated on 2/13/2011:  It looks like people were having problems with the download.  I have updated this post with new documents.  Please let me know if there are any other problems.

Sometimes keeping up with the work of running a household is NOTHING short of overwhelming.

One thing that has really helped me to stay on top of things is by using a printable "To Do" list.  Every Sunday I hang this list on my refrigerator as a reminder of what I need to get done in a given week.  I kind of play a game with myself to see how much I can get checked off on any given week.  It is a real motivator for me! 

So, as my little gift to you, I present these printable "Busy Mom To Do Lists".  (I have heard that they are equally effective for Busy Dads too!)  I have provided three different options for you to choose from.

1)  Already Filled-In Chore List- Need a "chore system" that is already put together?  This is the exact list that I use at home. It has all of the chores filled in for every day, plus some room for you to write in any extra chores you have specific to your home.
You can download it for free by clicking on the link below.


2)  Blank Chore List-  Do you want to move some chores over to different days?  Are your chores completely different than mine?  Well, here is a blank document that you can print and then write in your own chores on any day you want.
You can download it for free by clicking on the link below.


3)  Electronically Editable Chore List-  Do you despise writing things in by hand?  Do you want a pretty chore list that you can hang on your 'fridge that is customized to your home? Do you want to pick your own fonts and colors? Well, here is a word documented that is pre-formated for you to electronically edit with your own chores. You may modify this any way you want.  Just please do not remove my blog name.
You can download it for free by clicking on the link below.
Download Busy Mom's To Do List-Modify Electronically.doc
(Make sure you select DOC when you download it.)


Please be Kind and Pay it Forward:
These documents may be modified and reproduced by individuals only.  All I ask is that you please do not remove my blog name from the document.  Also, if you found these documents helpful, please consider "paying it forward" by sharing this page on facebook, twitter, or your own blog.
Tips for Creating your own To-Do Lists:
1)  General Organization Tips:  When making a "To Do" lists, I found it helpful to divide tasks into two categories:  things I need to do daily, and things I need to do only once a week.  I have also found it helpful to divide larger jobs into smaller tasks.  For example, I don't just say "Clean the kitchen"---I divide that larger job into tiny pieces that way it doesn't seem so overwhelming, and I can celebrate every little thing that I get done.  (Even if I don't actually get the entire kitchen cleaned!)


2)  Give yourself a break:  I like to warn people not to fall into the "All of Nothing" mentality.  You may NEVER get everything on your To Do lists done during the week.  But the lists at least give you a goal to shoot for.  So don't beat yourself up if you don't get everything on the list finished each week.  In fact, I personally have never gotten every single thing checked off!  I just accept that I am in the season of my life where I might not always have a perfectly clean house.  Although the list gives me something to shoot for.  So, again, don't give up or feel overwhelmed if you don't get everything checked off!  Instead look at it positively and make it a goal to get as many things as possible checked off.  The list is there to help you, not to add extra stress to your life.  Focus on the positive--and how much you are getting done vs what you aren't getting done.

This is Part 1 in my series on Household Chores:
1)  Part 1:  Printable Chore List (You are here)
2)  Part 2:  Top Ten Tips for Tackling Chores

Links to Become Attached To:
 

Blog Template by BloggerCandy.com